

Have you ever found yourself with leftover cake and wondering what to do with it? Making cake pops from leftover cake is a great way to use up those leftovers and create a fun and delicious treat. Not only are cake pops easy to make, but they can also be customized to suit your taste preferences and the occasion you are making them for. Making cake pops is my absolute favorite way to use any leftover cake (although there seldom is leftover cake as they tend to disappear in minutes!)!
There are countless options and tips to consider when making cake pops from leftover cake. First, you can choose to mix in cream cheese, frosting, or candy melts to create a dough-like consistency. Once you have your cake dough, you can roll it into small balls and insert cake pop sticks. From there, you can choose to dip your cake pops in melted chocolate or candy melts and decorate them with sprinkles, crushed cookies, or any other toppings of your choice.
If you’re feeling adventurous, you can also experiment with different flavors and variations. For example, you can add nuts, dried fruit, or even liquor to your cake dough. You can also try making different shapes and designs using molds or cookie cutters. With so many options and variations, the possibilities are endless when it comes to making cake pops from leftover cake — or maybe you even want to bake a cake so that you can use it to make super scrumptious cake pops!
Option 1: Crumble and Mix
If you have leftover cake, you can easily turn it into delicious cake pops with just a few simple steps. The first option is to crumble the leftover cake and mix it with frosting or candy melts to make a thick dough. Here’s how:
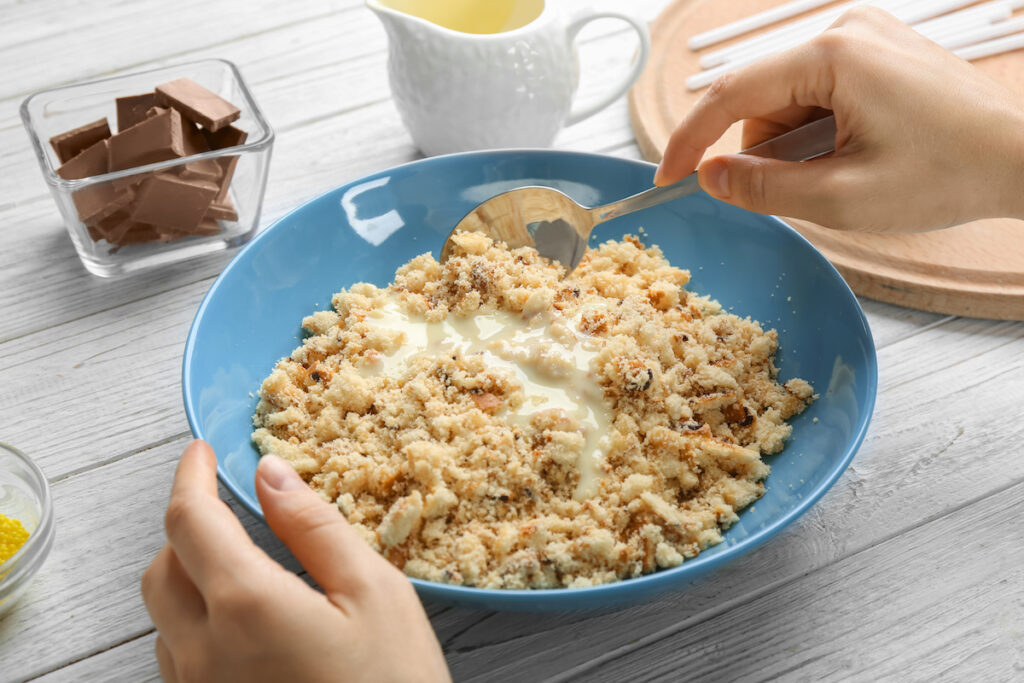
- Crumble the leftover cake into a bowl and crush it with a utensil.
- Mix in enough (flavored) cream cheese, frosting, or candy melts to make a thick dough.
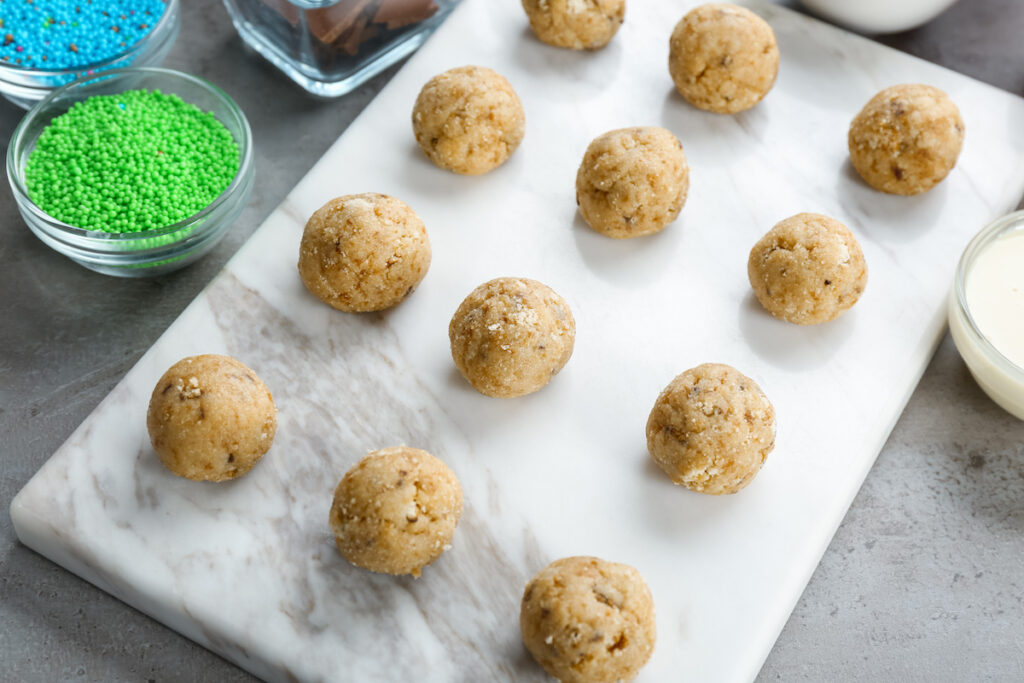
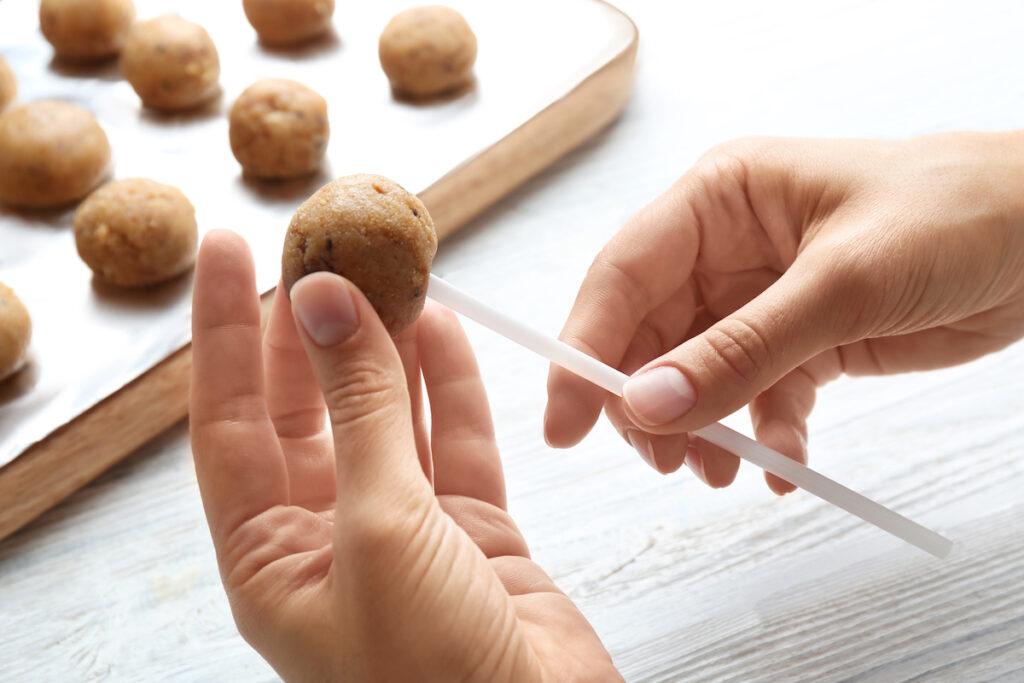
- Roll the dough into small cake balls and insert the cake pop sticks carefully in the center.
- Place the cake balls on a lined baking sheet and freeze them for about 30 minutes.
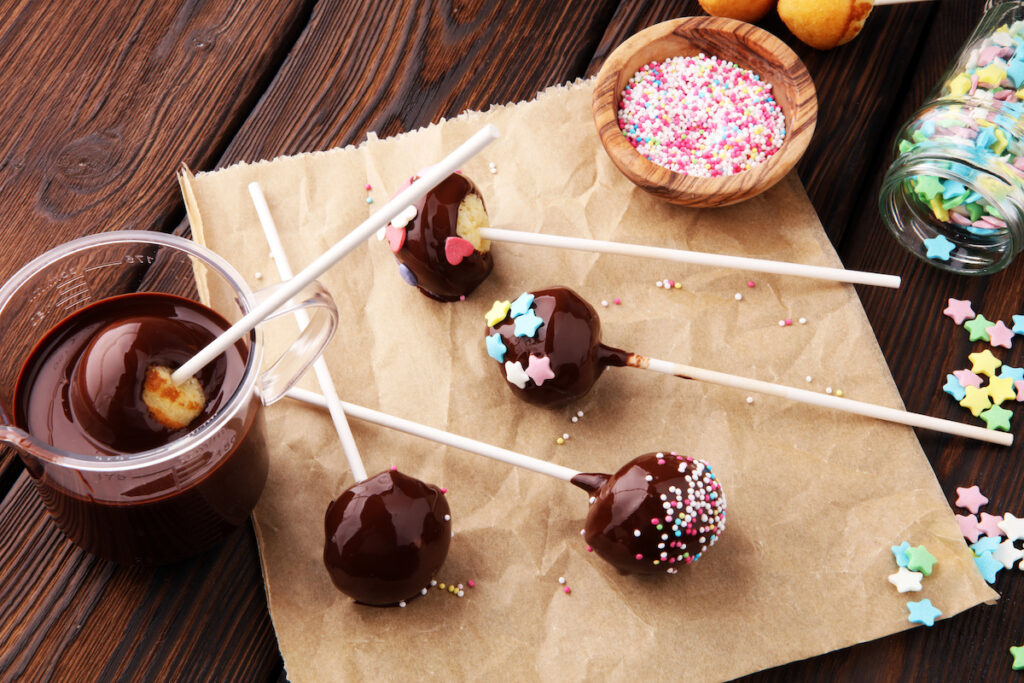
- Melt some chocolate or candy melts in a microwave or a double boiler.
- Dip the frozen cake balls into the melted chocolate or candy melts and decorate them with sprinkles or other toppings.
- Let the cake pops cool and harden before serving.
This option is great because you can use any type of cake and frosting combination you like, and you can customize the decorations to fit any occasion or theme. You can also experiment with different flavors and textures by adding nuts, dried fruits, or other mix-ins to the cake dough.
However, be careful not to add too much cream cheese, frosting, or candy melts, as the dough may become too soft or sticky and difficult to handle. Also, make sure to freeze the cake balls before dipping them in chocolate, as this will help the chocolate harden faster and prevent the cake from falling off the stick.
Option 2: Blend and Roll
Another easy way to make cake pops from leftover cake is to blend the cake with frosting in a food processor or blender, then roll the mixture into balls. This method is quick, easy, and requires minimal effort.
To get started, crumble your leftover cake into a food processor or blender. Pulse the mixture until it is finely ground. Add in a few spoonfuls of frosting, and pulse again until the mixture comes together in a ball.
Once your cake and frosting mixture is ready, use a cookie scoop or spoon to portion out the mixture into small balls. Roll each ball between your palms to smooth it out and shape it into a round cake pop.
One variation of this method is to add in different mix-ins to the cake and frosting mixture. For example, you could add in chopped nuts, chocolate chips, dried fruit, or even sprinkles to give your cake pops some extra texture and flavor.
Another variation is to dip your cake pops in different types of chocolate or candy melts. You could dip them in dark chocolate, white chocolate, or even colored candy melts to match the theme of your event or party.
Instead of frosting, use cream cheese. Vanilla, lemon, and orange-flavored cream cheese varieties are tasty options.
Overall, blending and rolling is a quick and easy way to make cake pops from leftover cake. With just a few simple steps, you can transform your leftover cake into a fun and delicious treat that everyone will love.
Option 3: Mold and Chill
If you have a silicone mold, you can use it to make perfectly shaped cake pops. Simply prepare the cake batter and pour it into the mold. Bake the cake in the mold according to the instructions, and then let it cool completely.
Once the cake has cooled, remove it from the mold and crumble it into a bowl. Mix in enough frosting or candy melts to make a thick dough. Roll the dough into small cake balls and insert the cake pop sticks carefully in the center. Place the cake balls on a lined baking sheet and freeze them for about 30 minutes.
After the cake balls have been chilled, you can decorate them with melted chocolate, sprinkles, or any other toppings you like. You can also experiment with different flavors and colors of cake and frosting to create unique cake pops.
One variation of this method is to use a cake pop maker instead of a silicone mold. Simply pour the cake batter into the cake pop maker and bake according to the instructions. Once the cake pops are baked, remove them from the maker and let them cool completely before decorating.
Another variation is to use different types of molds, such as heart-shaped or star-shaped molds, to create different shapes of cake pops. You can also experiment with different types of cake, such as chocolate or red velvet, to create different flavors of cake pops. Bright red red velvet cake topped with white chocolate or white candy melts is a stunning and extremely palatable variation!
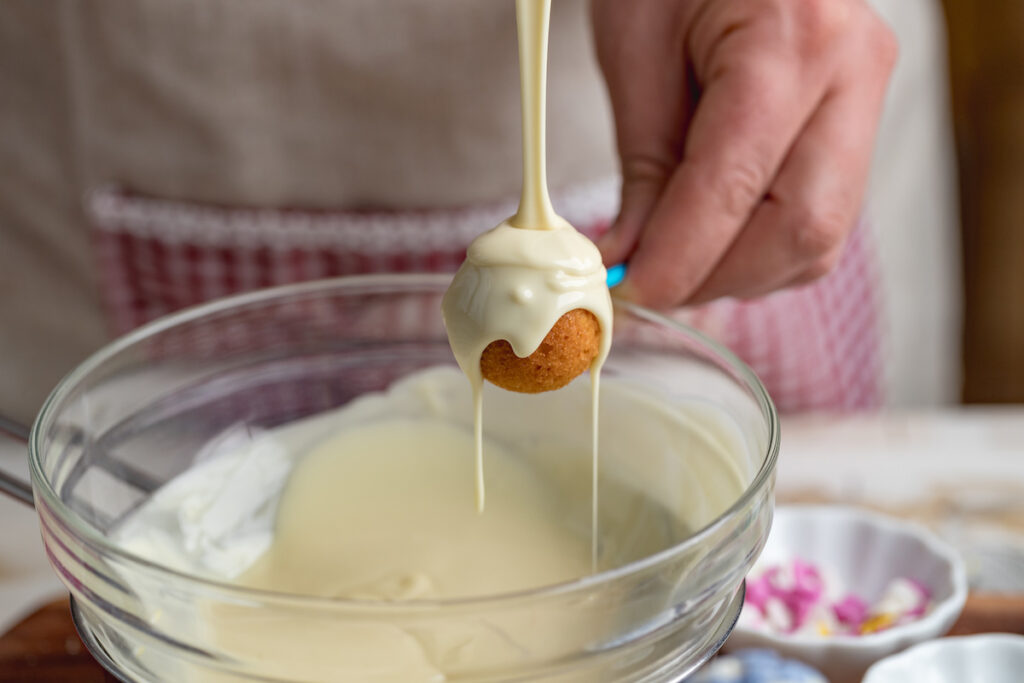
Option 4: Dip and Decorate
If you want to add some flair to your cake pops, dipping and decorating them is a great option. Here are some tips to help you make beautiful and delicious cake pops:
- Use candy coating or melted chocolate to dip your cake pops. You can find candy coating at most craft stores or online.
- Make sure your cake pops are completely cooled before dipping them. If they are still warm, the coating will slide off.
- Insert the cake pop stick into the cake ball, leaving about an inch sticking out. This will make it easier to dip and handle the cake pop.
- When dipping the cake pop, make sure the coating is deep enough to cover the entire cake ball. You can use a spoon to help coat the cake pop evenly.
- After dipping, gently tap the cake pop on the side of the bowl to remove any excess coating. You can also use a toothpick to remove any air bubbles or excess coating.
- Before the coating dries, add some sprinkles or other decorations to the cake pop. This will add some color and texture to your cake pops.
- Once the cake pops are decorated, place them on a parchment-lined baking sheet to dry. You can also prop them up in a cake pop stand or foam block.
- Allow the cake pops to dry completely before serving or storing. This will ensure that the coating stays intact and the decorations don’t fall off.
With these tips, you can create beautiful and delicious cake pops that are perfect for any occasion. Whether you’re using leftover cake or starting from scratch, dipping and decorating your cake pops is a fun and creative way to enjoy this tasty treat.
Option 5: Stuff and Dip
If you’re looking to add some extra flavor and texture to your cake pops, consider stuffing them with a surprise filling and dipping them in a variety of coatings. Here are a few ideas to get you started:
- Stuff with peanut butter and dip in chocolate
- Stuff with Nutella and dip in crushed hazelnuts
- Stuff with vanilla-flavored cream cheese and dip in graham cracker crumbs
- Stuff with caramel and dip in sea salt
- Stuff with cookie dough and dip in sprinkles
To stuff your cake pops, simply make a small indentation in the center of the cake ball with your finger or a small spoon. Fill the indentation with your desired filling, then cover it with a small piece of cake and roll it back into a ball shape. Dip the stuffed cake pop in your desired coating and let it dry.
When it comes to coatings, the possibilities are endless. Here are a few ideas to inspire you:
- Chocolate chips, melted
- Sprinkles
- Cookies, crushed
- Nuts, chopped
- Candy bars, crushed
To dip your cake pops, simply melt your desired coating in a microwave-safe bowl or on the stove, then dip the cake pop into the coating and let it dry. You can also drizzle additional coatings over the top for added decoration.
Experiment with different flavor combinations and coatings to create your own unique cake pop creations. Have fun and enjoy!
Option 6: Frost and Shape
Another option for making cake pops from leftover cake is to frost and shape the cake into balls. This method is similar to the traditional cake pop making process, but it uses leftover cake instead of a freshly baked cake.
To begin, crumble your leftover cake into a large bowl. Next, add your favorite frosting to the bowl and mix until the cake and frosting are well combined. You can use any type of frosting that you like, but cream cheese frosting or chocolate ganache are popular choices.
Once the cake and frosting are mixed together, use your hands to shape the mixture into small balls. You can make the balls as big or as small as you like, but aim for a size that is easy to handle and eat. Place the cake balls on a baking sheet lined with parchment paper.
After shaping the cake balls, you can decorate them with sprinkles, chopped nuts, or melted chocolate. You can also dip them in melted chocolate and add a stick to turn them into cake pops. Place the cake balls in the refrigerator to chill and set the chocolate.
This method allows for more creativity and customization than other methods of making cake pops from leftover cake. You can experiment with different frosting flavors and decorations to create unique and delicious treats.
Option 7: Glaze and Sprinkle
If you want to add some color and texture to your cake pops, you can glaze them with a colorful coating and sprinkle them with various toppings. Here’s how to do it:
- Melt some candy melts or white chocolate in a microwave-safe bowl, stirring every 30 seconds until smooth.
- Dip the cake pops into the melted chocolate, making sure to cover them completely.
- Place the cake pops on a sheet of parchment paper and let them cool for a few minutes.
- While the chocolate is still wet, sprinkle the cake pops with your favorite toppings, such as sprinkles, crushed cookies, chopped nuts, or edible glitter.
- Let the cake pops dry completely before serving or packaging.
You can experiment with different colors and flavors of candy melts to create a variety of looks and tastes. For example, you can use pink candy melts for a Valentine’s Day theme, green candy melts for a St. Patrick’s Day theme, or orange candy melts for a Halloween theme.
Another variation is to drizzle the melted chocolate over the cake pops instead of dipping them. You can use a fork, a piping bag, or a squeeze bottle to create a decorative pattern. This technique works well with contrasting colors, such as white chocolate over dark chocolate cake pops or vice versa.
You can also use edible markers or food coloring to draw designs or patterns on the cake pops before or after glazing them. This is a fun and creative way to personalize your cake pops for special occasions or events.
Option 8: Layer and Freeze
If you want to make cake pops from leftover cake, but don’t have the time to make them right away, you can layer and freeze the cake and frosting mixture for later use. This option allows you to make cake pops at your convenience.
To layer and freeze the cake and frosting mixture, you’ll need to:
- Crumble the leftover cake into a large bowl
- Add enough frosting to make a soft dough
- Line a baking sheet with parchment paper
- Spread the cake and frosting mixture onto the baking sheet
- Smooth the mixture into an even layer
- Place the baking sheet in the freezer for at least 30 minutes, or until firm
- Remove the baking sheet from the freezer and use a cookie cutter or cake pop mold to cut out shapes
- Insert a lollipop stick into each cake pop
- Place the cake pops back on the baking sheet and return them to the freezer until ready to use
Layering and freezing the cake and frosting mixture can save you time and allow you to make cake pops whenever you want. Plus, you can experiment with different shapes and sizes by using different cookie cutters or cake pop molds.
Just remember to store the cake pops in an airtight container or freezer bag to prevent freezer burn. When you’re ready to enjoy them, simply thaw them in the refrigerator for a few hours or at room temperature for about an hour.
Option 9: Crush and Cover
I love this option because it allows for so much creativity! To start, crumble your leftover cake into a bowl and mix in your frosting until you have a thick dough. From here, you can add in any flavorings, extracts, or other mix-ins that you want. Once you have your dough ready, it’s time to get creative with the coverings. You can use anything from melted chocolate to candy melts to create a coating for your cake pops. Here are a few ideas to get you started:
- Melted white chocolate with crushed candy canes mixed in
- Melted dark chocolate with chopped nuts sprinkled on top
- Candy melts in different colors with sprinkles or edible glitter
- Melted caramel with sea salt flakes
To cover your cake pops, you can either dip them directly into the melted coating, or use a spoon to drizzle it over the top. Once you have your coating on, you can add any additional decorations or toppings that you want. One tip for this option is to make sure your cake dough is firm enough to hold its shape. If it’s too soft, it may not hold up well when you try to coat it. You can add more frosting or even a little bit of flour to help firm it up if needed. Another tip is to make sure your coating is smooth and even. If it’s too thick, it may be difficult to work with, and if it’s too thin, it may not cover the cake pop completely. You can adjust the consistency by adding a little bit of oil or shortening to thin it out, or more melted chocolate or candy melts to thicken it up. Overall, this option is a great way to let your creativity shine and make unique, personalized cake pops that everyone will love!
Option 10: Stuff and Bake
If you want to take your cake pops to the next level, try stuffing them with some extra goodies before baking. This is a fun way to add some surprise and excitement to your cake pops.
Here are some ideas for what to stuff your cake pops with:
- Chocolate chips
- Peanut butter cups
- Nutella
- Fruit preserves
- Caramel
To stuff your cake pops, simply take a small amount of the cake pop mixture and flatten it into a disc. Place your chosen filling in the center, then fold the edges of the disc up and around the filling to enclose it completely. Roll the mixture into a ball as usual, making sure the filling is well distributed throughout the cake pop.
Bake the cake pops according to your recipe, making sure to keep an eye on them so they don’t overcook or burn. When they’re done, you’ll have delicious cake pops with a surprise center!
Some variations you can try with this option include:
- Using different types of cake for the outer layer, such as chocolate or lemon
- Experimenting with different fillings, such as mini marshmallows or crushed cookies
- Coating the cake pops in different types of chocolate or candy melts
Get creative and have fun with this option!
Tips and Variations
Tip 1: Use a food processor or blender to crumble the cake
When making cake pops from leftover cake, it’s important to crumble the cake into small, uniform pieces. One easy way to do this is to use a food processor or blender. Simply break the cake into chunks and pulse in the food processor until it forms fine crumbs. This method is quick and efficient, and ensures that the cake is evenly crumbled.
Tip 2: Add frosting or cream cheese to the crumbled cake for added moisture and flavor
Leftover cake can be dry, so adding a bit of frosting or cream cheese to the crumbled cake can help add moisture and flavor. Start with a small amount and mix it in well, adding more as needed to achieve a dough-like consistency.
Tip 3: Use cookie cutters or silicone molds to create uniform shapes
To create uniform shapes for your cake pops, try using cookie cutters or silicone molds. Simply press the crumbled cake into the mold or cutter, then remove the excess and shape into balls. This method is great for creating themed cake pops, such as hearts or stars.
Tip 4: Chill the cake pops before dipping to prevent them from falling apart
Before dipping your cake pops in chocolate or candy melts, be sure to chill them in the refrigerator or freezer for at least 30 minutes. This will help them firm up and prevent them from falling apart when dipped.
Tip 5: Use candy melts instead of chocolate for easier melting and dipping
Candy melts are a great alternative to chocolate when making cake pops. They come in a variety of colors and flavors, and are easier to melt and dip than chocolate. Simply follow the package instructions for melting and dipping.
Tip 6: Add food coloring or flavor extracts to the candy melts for added color and flavor
To add a pop of color or flavor to your cake pops, try adding food coloring or flavor extracts to the candy melts. This is a great way to customize your cake pops and make them stand out.
Tip 7: Use sprinkles, chopped nuts, or crushed cookies to decorate the cake pops
Once your cake pops are dipped, try decorating them with sprinkles, chopped nuts, or crushed cookies. This is a fun and easy way to add texture and flavor to your cake pops.
Tip 8: Use lollipop sticks or skewers to hold the cake pops while dipping and decorating
To make dipping and decorating your cake pops easier, use lollipop sticks or skewers to hold them. Simply insert the stick or skewer into the cake pop before dipping, then remove it once the chocolate or candy melts have hardened.
Tip 9: Store the cake pops in an airtight container in the refrigerator or freezer for longer shelf life
To keep your cake pops fresh for longer, store them in an airtight container in the refrigerator or freezer. They will keep for up to a week in the refrigerator, or up to a month in the freezer.
Tip 10: Experiment with different cake flavors, frosting flavors, and decorations for endless variations
The great thing about making cake pops from leftover cake is that you can experiment with different flavors and decorations. Try using different cake flavors, frosting flavors, and decorations to create endless variations.

Can you Make Cake Pops without Frosting?
Yes, cake pops can be made without frosting. There are various recipes available that use alternative ingredients to replace frosting, such as cream cheese, chocolate, or even graham crackers. Some recipes also call for the use of fruit purees or jams to add moisture and flavor to the cake pops. So, it is definitely possible to make delicious cake pops without frosting.
Conclusion
Making cake pops from leftover cake is a fun and creative way to use up any excess cake and reduce food waste. With a few simple steps, you can turn your leftover cake into delicious bite-sized treats that are perfect for parties, gifts, or just as a sweet snack.
Here are some final tips and variations to help you make the most out of your cake pop creations:
- Experiment with different cake flavors and frosting combinations to create unique and tasty cake pops.
- Try adding in extra mix-ins like chocolate chips, nuts, or sprinkles for added texture and flavor.
- Use different types of candy melts or chocolate coatings to create a variety of colorful and visually appealing cake pops.
- Consider using different shapes and molds to create themed cake pops for holidays or special occasions.
- Don’t be afraid to get creative with your decorating! Use icing, sprinkles, or edible glitter to make your cake pops stand out and sparkle.
- If you’re short on time, consider using pre-made cake mix and frosting to speed up the process.
- Store your cake pops in an airtight container in the fridge or freezer for longer shelf life.
- Consider making a large batch of cake pops to have on hand for impromptu gatherings or as a quick and easy dessert option.
- Get the kids involved! Making cake pops can be a fun and engaging activity for children and a great way to teach them about reducing food waste. Just make sure to handle the hot, melted chocolate or candy melts yourself and let the kids do the mixing and decorating.
- Remember to have fun and enjoy the process of creating your own unique cake pops — and don’t forget to share your creations on social media!