
Introduction: Origins of Pastillas
Pastillas, alternatively called Pastillas de Leche, is a type of milk-based candy popularized relatively recently to the Western world. Its origins are in the town of San Miguel, in Bulacan, Philippines. From there, they spread out all over the other Philippine regions, with a small industry eventually emerging for the product. They are usually made from carabao or cow milk or a combination of both with refined sugar and calamondin juice often added during the process.
The pastillas had been a source of pride and a unifying symbol for the people of Philippines, with the town of San Miguel celebrating the “Pastillas Festival” in 2006. Unfortunately, even though the pastillas industry has evidently survived and spread, the traditional art of pastilla making, the pabalat, has gone nearly extinct.
This article is going to give you all the tools and instructions necessary to do it yourself. It will contain a lengthy do it yourself family pastillas recipe for you to try and enjoy with your loved ones. As you will soon see, there are two ways you can approach pastillas making: Uncooked and cooked pastillas.
Ingredient List and Description
- Powdered milk and condensed milk: Keep in mind that the amount you use does not really matter, as long as you keep the ratio two to one. In other words, for every two powdered milk cups, you are going to need one cup of condensed milk. Feel free to use any kind of measurement, such as tablespoons or glasses instead of cups, as long as you keep the two to one ratio as much as possible.
- Sugar: Well. Every candy needs sugar, does it not? This is largely to enrich their taste. You could theoretically replace sugar with stevia, but we have not personally tried it to vouch for the results. Feel free to experiment, if you have the inclination and time.
- Butter or Margarine: Both ingredients can be used as they achieve pretty much the same thing: Making your mixture more creamy. If you do not feel like adding them, feel free to skip. They are not essential for making pastillas.
- Cellophane or Japanese Paper: This is for wrapping for your candy. If you have it or can find it, we encourage you to go for the Japanese Paper, to be more in line with the traditional Pastillas. Cellophane will do just find, however.
Uncooked Pastillas
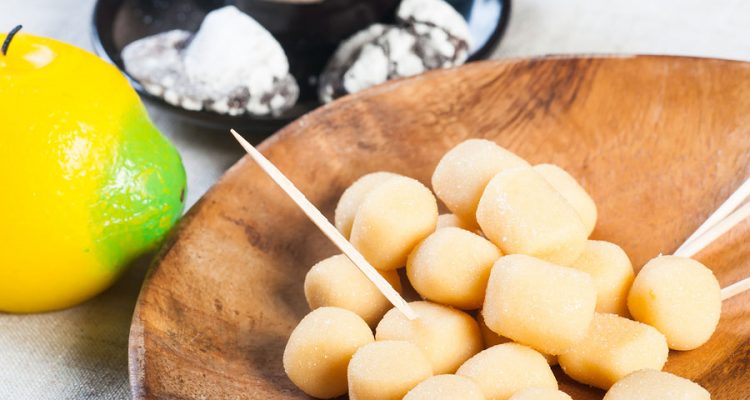
For our first method, you will need no cooking whatsoever. Our recipe and proposed ingredients will give you roughly eighty pastillas pieces. You will need two cups of powdered milk, fourteen oz. of condensed milk, half a cup of sugar and a tablespoon of margarine or butter. You will first need to pour the two types of milk in a bowl and mix them together. Make sure you have a sturdy spoon, as the mixture will be thick and hard to mix together. Patience is a virtue.
Add your margarine or butter to the mixture to add a creamy flavor to your candy – mix thoroughly. After you’re done mixing, you now want to start giving shape to your mixture with your hands. Traditional pastillas were either circular or column shaped, much like a cylinder. Choose the shape you like best.
After you’ve shaped the candy appropriately, pour half a cup of sugar on a plate and start rolling the candy circularly in it until they were completely covered by sugar. Finally, you have to wrap the pastillas.
Traditionally pastillas were wrapped using the pabalat technique, a form of papercutting that involved intricate papercut designs from Japanese paper. Understandably, you will probably be short on Papei de Hapon, so cellophane should do the job nicely.
After the candy has been wrapped tight, it is ready to serve. Have them for dessert or as a snack whenever you feel like indulging your sugary tooth.
Cooked Pastillas
Even though the second method is a bit lengthier it is well worth the time and we heavily encourage you to give it a try unless you are very short on time. Firstly, similarly to the uncooked version, you need to combine the condensed and powdered milk together. Only this time you’re going to add in the sugar immediately, and put the ingredients in a saucepan. Make sure you thoroughly stir the ingredients while heating them, all the way until they turn to a paste.
Eventually, the mixture will start to boil. This is when you add the spoonful of butter or margarine – continue mixing the ingredients intensely and thoroughly. After a little, you should close the heat, take your pan off and transfer your mixture to a bowl. Let it wash off its heat until its cool for no less than ten minutes. It should be still warm to the touch, but cool enough for you to handle it.
Using either your hands or a spoon, start giving it shape. Like mentioned earlier, traditionally, pastillas were either cylindrical or circular but feel free to experiment should you so desire. After you’ve made your candy pieces, add even more sugar to them and roll them until they are gently yet uniformly covered in it.
After you’re done, like in our previous method, you have to wrap the candy up. Make sure you tuck the ends of the paper or cellophane you’ve used into a roll. Voila. Ready to be served.
Conclusion
Now that your candy is ready, you and your loved ones are in for a delicious treat. As you saw, making pastillas is relatively easy and quite cheap – if you like them, keep making them. Just make sure you don’t binge on them, as they are deceptively high on calories. In our experience they usually last for roughly three days so make sure you consume them during that period. Meanwhile, you should try storing them in an air tight container. We sincerely hope you enjoyed our little guide for making pastillas, and you are encouraged to experiment with different cuisines and recipes.