
I have made several guitar cakes for clients and have always had a great time making them. They are relatively easy to make and don’t really require any unique tools unless you want to make the fondant butterflies, music notes, stars and flowers shown above. Whether you are planning to make one of the cakes above or you have a completely different guitar cake in mind, they all follow the same process. If you are planning to make the Taylor Swift cake, look at my notes at the bottom of this tutorial for a few tips.
- Decide how big of a guitar you want to make and roughly sketch it out on a piece of foam board or parchment paper. Keep in mind the size of a typical slice of cake for a party is 1 1/2″ x 2″. All of the cakes above required two sheet cakes and fed approximately 40 people. You may want to print a picture from the internet to help you when you’re drawing.
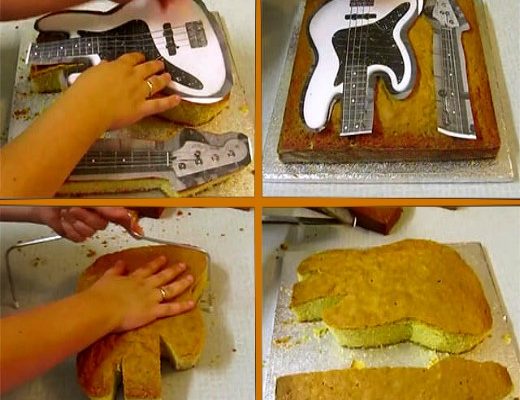
- Bake one or two (or more) sheet cakes to the size necessary for the template you have created. For example, a 2 foot guitar would take two sheet cakes. I have found that it’s easier to bake the cakes the day before, wrap them in saran wrap and place them in the freezer for the night.
- The next morning I usually take the cakes out of the freezer, allow them to get almost to room temperature, and then use the template to cut out the cake. I like to leave the saran wrap on the cake while I’m cutting it to keep the mess down. Be sure to cut out your template before cutting the cake.
- Trim around the top edge of the cake to remove the sharp corner that was caused from cutting it out.
- I like to put some filling (or extra buttercream) inside the cake at this point. It not only helps to keep the cake moist but also gives it a little more height. You will want to put the cake on the cake board at this time since you will not want to move it from this point on.
- You are now ready to frost the cake. You can color your frosting any color you want for the guitar but be sure to hold out some white buttercream to pipe the guitar strings. If you follow my previous post about how to smooth your frosting using the Viva Paper Towel Method, you’ll be able to use it at this time. Be sure to allow the “crust” to form before you start to smooth it. Congratulations! You are halfway done!
- Now the fun part . . . decorating. As I mentioned above, it’s entirely up to you at this point as to how you want to decorate the guitar. You can either buy cookie cutters to make the decorations or you can just print them on the computer, cut them out and use them as your template (just like you did with the cake). If you decide to use what you print on the computer, be sure to use a craft knife to keep the edges from looking crooked.
- Regardless of what decorations you plan to use, you will still need to put the guitar pieces on the cake. Using your guitar template, place a piece of parchment paper over the guitar template and sketch the other pieces (sorry, I’m not good with the names of guitar pieces). This will include the “neck” of the guitar, the tuning dials, the black “hole”, etc.
- Use the white buttercream that you saved to pipe the guitar strings.
- Some tips for making the Taylor Swift guitar – I printed the pictures of Taylor Swift with an edible printer (food coloring is used instead of toner cartridges). If you don’t have access to one then print them on your computer printer and tape them down on the board. You can then put a clear wrapping paper (purchased from any craft store) over the top of the pictures. Just be sure to lay your guitar template on the board so you don’t accidentally put a picture where the cake will be.
I hope you found this tutorial fairly easy and informative. If there are other cakes you would like to make but are not sure how to do them, let me know and I’ll see if I can help.
Donna