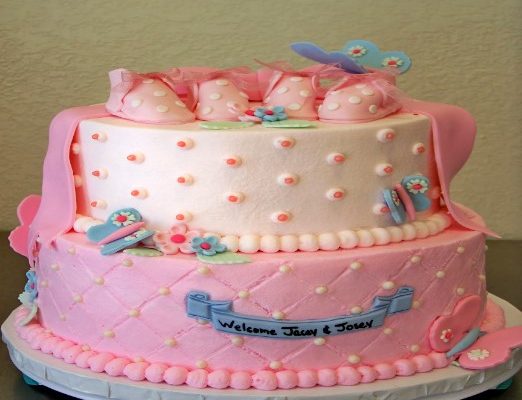
I have received a request for help with a cake and wanted to let everyone see the steps I take to make a two-tiered cake. The requester is making a 10″ and 12″ tiered cake so I will use these in my instructions. This is a picture of one of my cakes and it has most of the features associated with her cake (2 different colored tiers and polka-dots). I will give you the steps I would take, from start to finish, to make this cake. While you can do this all in one day, I’m writing it how I make cakes so this process is instructed to cover 2 days. I usually bake on Wednesdays, make decorations (the most time consuming thing) on Thursdays and decorate the cake on Fridays when I have cakes due on Saturday. Keep in mind that you could start baking up to a week in advance but not more than that or ice crystals will form on your cake and you could have problems when decorating it.
Before I begin, here are some items you want to have on hand to complete your cake. All of these can be purchased at Michael’s or Hobby Lobby but can also be found at some JoAnn’s or WalMart.
Equipment Needed
- Cake board – something to put your finished cake on. This should be four inches (4″) larger than your finished cake and very sturdy. In this case, it should be a 16″ round. These can be purchased at Michael’s or Hobby Lobby ready for use.
- 10″ cake cardboard – this looks like a piece of cardboard that is the shape and size of your top tier. They are usually sold in quantities of 6. You won’t need one for the bottom tier, just the top tier.
- Plastic cake plate the shape and size of the top tier with columns. (If you do not have these or cannot find them don’t stop here. Continue reading and I’ll help you through it when we get to that part. Just buy some large fat straws, also known as bubble straws. You won’t need the plastic cake plate if you use the fat straws.)
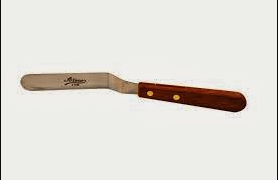
- Frosting Spatula (invest the money in a small angled spatula. Don’t buy the large one unless you just want to. I find these too bulky when trying to smooth the frosting. Spatulas will work better than a knife.)
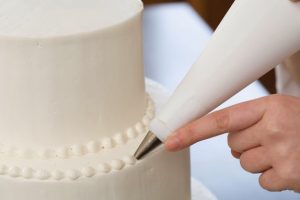
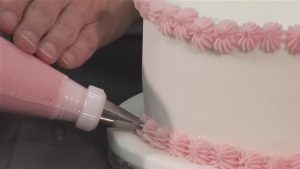
- Either a #12 round tip or a #22 star tip for the border around the base of the cake.
- 12″ or 18″ disposable pastry bags. You can also use gallon baggies.
Let’s Begin!
Day 1 – Step 1. Bake the cakes at least two days before the event and not more than 7 days before the event. If you are making it for a baby shower on Saturday, bake on Thursday. It takes a lot of the stress away and my future steps will keep it from getting stale or going bad. Each tier of this cake requires two cakes to be baked so you will need to bake two 10″ cakes and two 12″ cakes. Pans are sold for 2″ and 3″ deep cakes. All of mine are 2″ deep but either will work. Some people use three cakes for each tier but I find that it’s harder to deliver a cake when you’re worried about it falling, which is not worth it. Using the recipe from my previous blog (click here for it) be sure to include all the ingredients. If you want to add a box of pudding in addition to all of these ingredients then go ahead. Use the same flavor of pudding as your cake will be. If doubling the recipe, add two boxes! For these cakes you will probably have to make three or four batches of the doubled recipe so plan ahead on your ingredients.
The number one mistake you can make is to OVER-BAKE so don’t do that. When you see the cake starting to separate from the side of the pan then lightly touch the top with your fingers. If it leaves an indentation, leave the cake in the oven for about 10-15 minutes more. If it bounces back, and only if it bounces back, stick a wooden skewer in the middle of the cake and check for doneness. I usually just try to see what is on the end of the skewer. Pull it off. Does it feel doughy or does it feel like moist crumbs? Don’t put the skewer in too soon or the cake will collapse in the center. Keep in mind the middle of the cake will be the last area that cooks so that’s the area you want to watch.
Step 2. Immediately after you get the cakes out of the oven (yes, while they are still hot and in the pan) use a clean dish towel (with no fuzzies on it), drape it over the cake and lightly press down all over the cake to level it. Strange, huh? Yep, that’s me! My motto is “Whatever Works!” and that works for me!
If the cake seems to be spilling over the sides of the pan OR the top is a bit hard and crunchy then we’ll need to cut that off to level it. You can either do this now or at step 6 for Day 2.
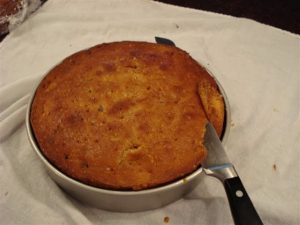
Using a long knife, cut across the top of the pan to make a level cake. This will take the entire top off the cake but that’s okay. I usually eat the scraps to see if the cake is moist. (What? How else are you going to tell if it’s moist?) If it’s not as moist as I want then I plan on using simple syrup.
Step 3. Now wrap each cake in saran wrap (yep, it’s still hot) and put them immediately in the freezer. At this point you should have four hot cakes in the freezer and they should no longer be in the pan but lying on a flat surface such as a cookie sheet or shelf. Make sure they are flat because the shape they take when they freeze is the shape they take when they thaw. All the condensation that develops on the inside of the saran wrap will be soaked back into the tiers when they thaw . . . keeping them moist!
Whew! Exhausted yet? While I usually take this time to start making fondant decorations (which we are not going to do) you are done for today unless you want to make your frosting and have it ready for Day 2.
Day 2 – Step 1. You will want to have the cake completely decorated the day before the event. Not only will it give you time to get ready and do last minute things on the day of the event but it will also need to do some last minute settling. There are several other reasons to get it done the day before but just trust me on this. Goofs happen as the cake settles and having time to fix them improves the odds of a pretty cake when you’re done.
As soon as you wake up, take the cakes out of the freezer and leave them sitting on a flat counter. They will take about two to three hours to thaw at room temperature. Do not open the plastic wrap during this time. The condensation will soak back into the cake. Now go have some breakfast and coffee, it’s going to be a long day!
Step 2. When I am ready to start decorating the first thing I do is make sure I have my frosting made. You will need about 12 cups of frosting for filling and frosting. If your top tier is going to be pink then take less than half of the frosting and color it pink. Leave the remainder white if that’s the color you want for the bottom tier.
Step 3. If you sampled the scraps and found the cake wasn’t as moist as you want then make some simple syrup. To do that put a cup of water, in a small bowl, in the microwave and get it fairly hot. Add one cup of granulated sugar and one teaspoon of vanilla extract. Stir it until all of the sugar is dissolved. Set it to the side for future use.
Step 4. Starting with your bottom tier, take one cake (removed from the plastic wrap) and set it on the middle of your cake board. If you leveled the cake with a knife already, as shown above, then move on to Step 6. If not, continue to Step 5.
Step 5. Touch around the top of the cake and see if it feels hard or crunchy. If it is soft then you can move on to Step 6. If it feels hard or crunchy then we need to level off the top of the cake. Leaving any hard parts on the cake will be discovered when people start eating it. Good rule of thumb is to just cut it off if you are unsure. If you have a cake leveler, great! If not, then you’ll need a ruler and some toothpicks. Using the ruler go all around the cake inserting a toothpick at the same height until you have something that looks like this:
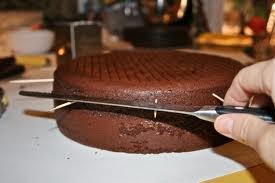
Place your serrated knife on top of the toothpicks and cut off the top. Don’t start on one side and push all the way across. I find that going in a continual circle and slowly moving towards the center of the cake works best. Don’t forget to eat your scraps!
Step 6. If your cake is not as moist as you’d like then it needs some simple syrup. Using a pastry brush, brush the syrup all over the top of the cake until you have covered the area. Don’t apply too much or it will start to seep out the bottom of the cake. Barely brushing the top of the cake will allow the cake to soak up the syrup and make the cake moist before the syrup has time to reach the bottom.
Step 7. Put a large dollop of frosting in the middle and level it out. This will be your filling so you want it to be about 1/2 inch thick.
Step 8. Level your second cake that is the same size and turn it upside down onto the filling of your first cake, like this:

Step 9. Now you can frost the cake. I’m not going to go into how to frost the cake with this tutorial but I will say that it’s like buttering a piece of toast with hard butter. You want to apply pressure while sliding the spatula around. If you pull the spatula straight up then you’ll pull frosting with you. Review my post with the Viva Paper Towel Method of smoothing your frosting. You do not want to decorate any of the tiers until they have been stacked.
Step 10. After you get the bottom tier finished, you’ll want to move on to the top tier. In order to do this you’ll want to put the 10″ cake cardboard onto another plate, cookie sheet or tray and do the same as in Steps 6 through 9. Put it all in the fridge to firm up for a little bit and go have lunch.
Step 11. You should now have both tiers frosted but not stacked, correct? Set the bottom tier on the counter, leaving the top tier in the fridge. We now want to prepare the tier for stacking. Pick which method you plan to use below:
Plastic cake plate and columns: If you are using this method then you want to take the plate (minus the columns) and lightly set it on top of the tier, moving it around so that it’s perfectly centered. It helps to use a small ruler and measure from the plate to the edge of the cake all the way around, adjusting it as you go along. Once the plate is centered, slightly press down to leave an indentation on the cake. You should be able to see the outline of the plate and the location where each column will go. Take the plate off.
Stand your columns up to the side of the cake and make sure they are not taller than the height of the cake. If they are, cut them down with a small hand saw and wash off any excess. Put the columns onto the plastic plate (cut side to the plate) and line it up to the marks on the cake. Press down until the columns are inside of the cake and the top of the plate is even with cake. You can now move on to step 12.
Cake cardboard and fat straws: If you don’t have the plastic plate and columns you will want to use this method. Using a clean cake cardboard the size of your top tier, lightly set it on top of the tier, moving it around so that it’s perfectly centered. It helps to use a small ruler and measure from the plate to the edge of the cake all the way around, adjusting it as you go along. Once the cardboard is centered, slightly press down around the edges to leave an indentation on the cake. You should be able to see the outline of the cardboard at this point. Now that you know where the top tier will go you will want to add supports. Some people use dowels and cut them to the correct height. I use fat straws (also known as bubble tea straws) such as these:
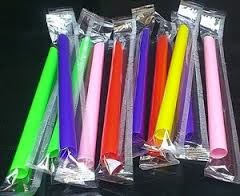
They are larger than most drinking straws and are very strong. Plus, they are easy to cut with a pair of scissors! You can buy these online and in some stores. One end is flat and the other end is angled. Always put the flat end into the cake and cut off the angled end to avoid any malfunctions. You will want to put enough straws into the cake to support the weight of the top tier. This picture that I found online is a good indication of how many supports (or straws) you’ll want to put in the cake:
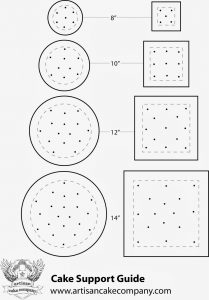
My basic rule of thumb is one number less than the cake you are supporting. For example, if the top tier is a 10″ cake than you want at least 9 straws supporting its weight. You can always do more but remember they’ll reduce the number of servings if you do too many. Insert the straw into the cake and, using your fingernail, mark it at the top of the cake. Pull the straw out slightly and cut straight across at that location. Push the straw back into the cake so the top of the straw is now level with the top of the cake. Continue to do this until you have all the straws in the cake.
Step 12. We are now ready to stack the cakes. Your top tier has been in the fridge and should be firm. If you want to put both tiers in the fridge to firm them up then do so now; you don’t want them to crumble when stacking them.
What I do at this point is set them both beside each other so I don’t have to move them too far. Since you frosted the top tier on the cake cardboard and on a plate or cookie sheet, the frosting is all the way to the plate or cookie sheet. Using a knife, insert it between the cake cardboard and the plate or cookie sheet. Run it all the way around to loosen the grip of the frosting and so that you can easily pick it up without frosting being pulled off. Set the knife aside. Put a small amount of frosting at the location the tier will go to act as the glue between the tiers.
Now for the scary part! Insert a sturdy cookie spatula under the cake cardboard and pick it up, setting it on the plastic plate or on the area previously decided for the tier. You have to move fairly quickly to avoid any disasters. Yay! The cakes are now stacked!
If there is any clean up that needs to be done (which there usually is) now is the time to do it.
Step 13. Now we are ready for decorations. Maybe it’s my OCD but I believe that if you are doing polka dots on the cake then they should be uniform all the way around, like this:
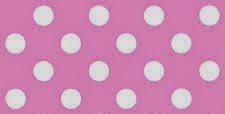
You can increase or decrease the number of dots based on their size but they should all follow this pattern (in my opinion) unless you are looking for polka dots that are randomly placed; then don’t do this. I, personally, find it harder to get a good looking “random” pattern than a uniform pattern.
Step 14. After both tiers of the cake are decorated on the sides and top then you’ll want to put a border around the base of each tier. This helps not only hide any goofs made while stacking but also reinforces the “glue” sticking them together and improves the overall look.
Before you begin, determine what will be the front and what will be the back of your cake. You will want to start and stop the border at the back. There are several pretty borders that you can do but just remember to keep it comparable in size to the size of your tiers. I would recommend either the #12 round or the #22 star tip. You will get these results from each:
Now you should be done! If you have only buttercream frosting on the cake (including the filling) then there is no need to refrigerate it. You can leave it at room temperature, out of the sunlight, until you have to deliver it. If, however, you have put a fruit filling in the cake you will need to refrigerate it. This is okay as long as there is no fondant on it. I have found in this Texas weather that fondant will develop a condensation and drip all over the cake while sitting in the refrigerator. The best rule of thumb is to either have fruit filling with no fondant (and refrigerate the cake) or don’t have fruit filling with fondant (and leave it at room temperature). If you really want fruit filling AND fondant then wait to put the fondant on the cake until the day of the event.
Cake making always seems to be a trial and error process for me. Different parts of the world may require different methods to avoid cake disasters. If you are new to the cake making process I hope I was able to help you make a cake for a great event. I encourage anyone tasked with the job of making a cake, and scared out of their minds, to send me an email with a picture of the cake and I will post a “What Would Donna Do” tutorial for making your cake. I am always happy to help!
Until next time!
Donna

