
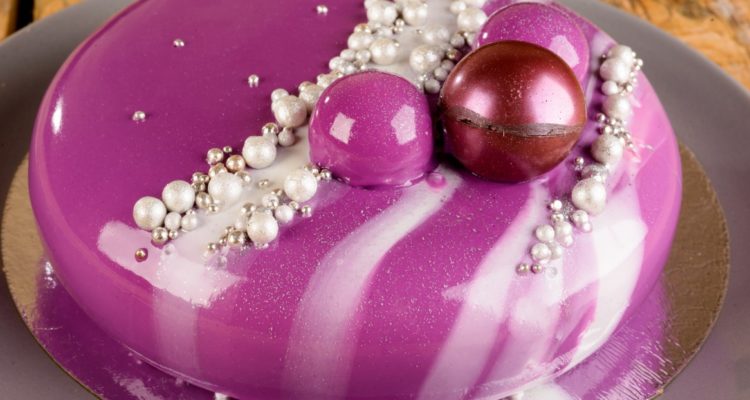
If the eyes are the mirror of the soul, then the mirror glaze cake is the mirror for the stomach, as you should be able to see your own reflection in this delectable dessert while you’re scarfing it down.
From a purely aesthetic angle, there are few things that look more impressive than an immaculate mirror glaze. If you’re here reading this, I can only assume that you think so, too.
Lucky for you, even though these cakes look super impressive if they’re done right, they’re deceptively simple to make. So let’s get to it. Here’s how to make and bake a mirror glaze.
What Is a Mirror Glaze, Exactly?
Before I dive straight into the baking of this dessert, let’s get to some definitional certainty about what I mean when I say “mirror glaze.”
A mirror glaze doesn’t technically refer to any particular dessert. Rather, it refers only to the molten mixture of (usually) chocolate (white or dark), sugar, and gelatin.
Once you know how to make a mirror glaze, you can apply it to basically any frosted dessert, whether that be donuts, homemade candy bars, classic French entremets, and of course, cakes.
History of the Mirror Glaze
Chances are, your interest in mirror glazing came from modern sources. They’re extremely photogenic desserts, and thus make great fodder for Instagram. But these desserts are not a contemporary invention.
The exact date is uncertain, but the culinary concept of glazing is medieval. It started in England, where chefs would glaze pastries with a mixture of beaten eggs and melted sugar. This was known at the time as an Elizabethan glaze.
Again, the date is unknown (though it had to have been after 1845), the French took this glazing technique and ran absolutely wild with it after introducing gelatin to the mix and invented what’s known in France as glacage mirroir.
How to Make a Mirror Glaze Cake
Alright, now that we’ve established some background, we can actually tackle the dang thing. To make a mirror glaze cake, we’ll need three recipes for three separate elements: the physical sponge cake, the icing, and of course, the mirror glaze.
The icing is a particularly crucial element because you absolutely can’t pour a mirror glaze over an unfrosted cake. The cake will just absorb most of it and the rest will stay on top but it won’t look very nice.
The key to making a great mirror glaze is having the smoothest surfaces and the sharpest edges on your cake, and you really can’t do that without a solid coat of icing.
We’re putting the cart before the horse a bit, though, so let’s tackle the cakes.
The Cake
For a mirror glaze cake, you can use just about any cake recipe you’d like, but for the sake of this guide, we’ll be making two 8-inch layer cakes using the “Chocolate Midnight Cake” recipe from Samin Nosrat’s famous cookbook, Salt Fat Acid Heat.
What I like about this recipe is that it’s super simple ingredient-wise, and it’s extremely flavorful and moist. Many people say they don’t like cakes because they’re too dry or not flavorful enough, but this recipe solves both those problems with two things: oil and coffee.
Most recipes call for adding butter. But the problem with butter is that it dries out in the oven. A neutral oil, however, has a higher burning point, which will help keep the cake moist in the oven. And then the coffee is added to the mix to add an extra punch of flavor (and I think it pairs well with the white chocolate glaze we’ll be using).
Here are the ingredients you’ll need:
2 ounces of cocoa powder
10.5 ounces of sugar
2 tsp of kosher salt
9.25 ounces of all-purpose flour
1 tsp baking soda
2 tsp of vanilla extract
1/2 cup of neutral oil, like vegetable or canola
1 1/2 cups of freshly brewed coffee
2 room-temperature eggs
To make the cakes, start off by preheating your oven at 350 degrees. Then, grease two 8-inch cake pans with Crisco, the oil you’ll be using, butter or nonstick spray. From there, line the bottom of the pans (and the sides if you’re feeling fancy) with parchment paper.
After that, whisk all of the dry ingredients together in a large bowl. This means the cocoa powder, sugar, salt, baking soda, and flour. In a separate bowl, mix the oil in the vanilla extract together. While you’re doing this, brew your favorite batch of coffee, and add it – still hot – to the vanilla and oil mixture.
Once your coffee is mixed in, make a well in the middle of your bowl of dry ingredients with a spoon and then slowly add your liquid ingredients to the mix. Then, whisk your two eggs and carefully add them to the mix, very slowly. The mixture will still be a little hot, so you run the risk of accidentally cooking the eggs if you’re not careful.
Once your batter has come to together, divide it between your two pans. At this stage, it’s important to make sure you don’t have any bubbles in your batter. If you see any bubbles on the surface, lightly tap the pans on the counter to pop them.
Lastly, throw them in the oven for 25 to 30 minutes. You’ll know they’re done when you lightly press down on the cakes and it springs back. Once you get that visual feedback, take them out and let them cool on the counter.
The Icing
For this cake, we’ll be making a classic vanilla cream frosting. For this, the ingredients are super simple. Here’s what you’ll need:
2 cups of heavy cream, cold
3 tsp of sugar
2 tsp of vanilla extract
Making icing is a delicate art, and requires a particular set of environmental conditions. All of your equipment has to be cold, whether that be the bowl of a standing mixer and its whisk attachment or if you’re going manual, your whisk and a (preferably) metal bowl. No matter what you use, make sure to chill your equipment for at least 20 minutes before you use them.
Once you’ve done that, mix all your ingredients together in your bowl. Then, if you’re using an electric mixer, run it at a low speed. If you’re whisking by hand, you can move as fast as you’d like. Whisking the cream introduces air to the mixture, and since the cream is thick enough, it can hold this air until it thickens.
Once it starts thickening, stop whisking every so often and check the icing on your whisk. If the icing is forming peaks on your whisk, then it’s ready to go. If not, keep whisking.
Composing the Cake
There are many ways to put a cake together, but I think the easiest route is to use a silicone cake mold. Frosting a cake free-hand is, frankly, a pain in the butt. And these cake molds make the task super simple. You’ll want to buy a cake mold that’s about an inch wider in diameter than your cake pan to make room for your icing.
Here’s how to do it.
Once your cakes have cooled completely, shave the tops of your cakes off with a serrated knife so that they’re nice and flat.
Then, use a silicone spatula to spread a one-inch layer of your icing on the bottom of your mold. On top of that, add your first cake, another layer of icing, and then the last cake.
Once all of your components are in the mold, place it carefully on a flat surface in your freezer. I recommend keeping the cake in there overnight so that it can freeze completely. But if you’re pressed for time, at least 8 hours should do the trick.
The Mirror Glaze
Alright, now for the most technical (and fun!) part of the whole process. To make your mirror glaze, you’ll need just 5 ingredients:
1 1/2 cups of sugar
1/3 cup of water
2/3 cup of sweet condensed milk
2 cups of white chocolate chips
2 Tbsp of unflavored gelatin
Optional:
Various food dyes
Glitter or gold leaf
The first thing you need to do is add your gelatin to 1/3 cup of water and mix thoroughly. This will make your gelatin “bloom.”
While your gelatin is doing its thing, add your sugar, water, and condensed milk to a medium saucepan and put it over medium heat. Stir this mixture occasionally and wait until it starts to bubble.
Once it’s bubbled, mix in your gelatin and turn off the heat. After that, mix in your white chocolate chips until there are no chunky bits left. You need your mixture to be as smooth as possible.
From here, you can either keep your glaze white or add food coloring to the mix. You make it either one solid color or divide your glaze into separate bowls, adding different colors, glitter, or gold dust to each.
No matter what you decide to do, you should put your glaze in a pourable container because it’s now time to dress your cake!
To pour your glaze properly, all you need to do is peel the silicone mold off your frozen cake and and place it on an elevated stand (you can use a can of food or the backside of a Tupperware container for this) and place a baking sheet underneath to catch the glaze that falls off the cake.
Once you’ve got your cake set up, pour your glaze on to the cake, starting at the edges and moving into the center in a circular motion. Make sure to pour the glaze just a few inches off the surface of the cake to avoid splatter and bubbles. You want your glaze to be as smooth and shiny as possible.
And that’s all there is to it! You are now an accomplished chef pâtissier, if you’ll forgive the French.
Want More Recipes?
If making a mirror glaze cake seems too challenging, or not challenging enough, feel free to check out the rest of my cake recipes! No matter what your palate or experience level is, I’ve got a recipe for you.